Frequently Asked Questions
- In the url bar in your browser window
- On the dialog that appears when you create a board
- Inside the sharing menu found in the top right corner
Your name is only used to make it easy for others to see who is currently at the board. It can be anything, as long as those at the board recognize you. The board you create will be initially named after you.
You can change the name of the board if you were the one who created it. You can change it on the "Board" dialog. To open the dialog, click on the icon in the bottom right corner, or click on the name of the board in the top bar.
There are strategy games designed for the 8 by 8 board you can play. They can be found in the Menu under Games, Strategy games. We have included some Chess minigames as well. These are simple games that are played with a subset of chess pieces.

There are five layers altogether. On the bottom layer are squares painted with the paintbrush. Numbers, arithmetic operators, icons for water, green bush and stone comprise the second layer. Above these you can put plain and numbered counters, smileys and flags. Chess and other playing pieces are placed on the fourth, while tickmarks and crosses go to the fifth layer.

Generate a clone link of your board and share that instead of the original link. Whoever opens this link receives their own unique board.
To create a clone link, open your board, then click the icon in the Top Bar. Expand the sharing menu by clicking the "downwards arrow" in the bottom right corner. This will show the "Generate clones" menu.
It is also possible to clone with or without history.
- Cloning with history preserves every state of the board and displays the position on the board at the time when the link was generated.
- Cloning without history only has a single state that displays the current position.
Use the "Breakout Boards" function to assign and send students to separate copies of your board. You can check in on them, and also close those boards when needed.
To open the "Breakout Boards" dialog, open your student list by clicking the

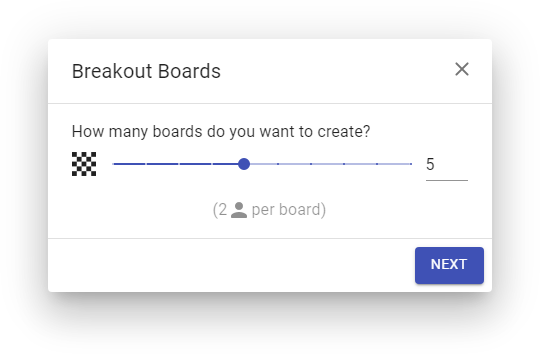
First, set the number of boards to create. Students will be evenly distributed at first. Click "Next" to proceed.

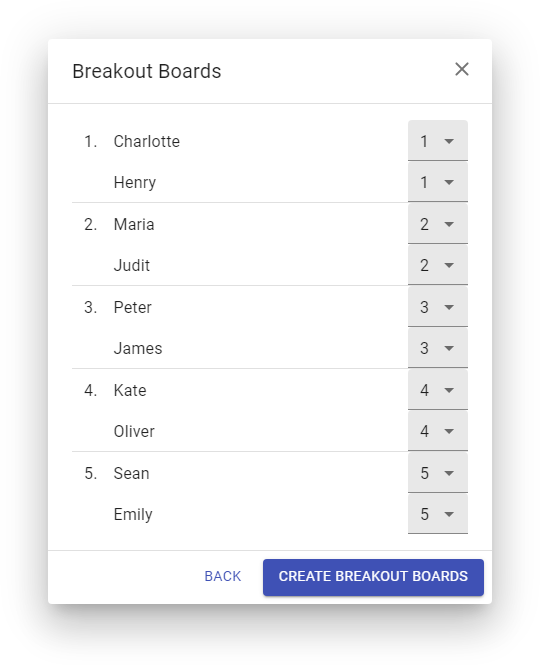
You can change how students are distributed between the boards by changing the board numbers on the right side. Clicking "Create Breakout Boards" will create the boards and send a notification to each student, asking them to join their assigned boards.

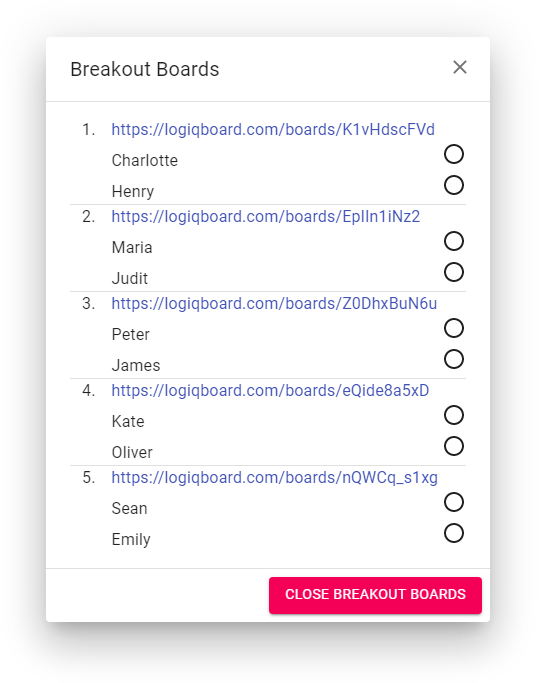
After the boards are created, the url for each board is displayed. Click these to join any breakout board and monitor progress. Along with the list of students, an indicator is also displayed showing which student has accepted the invitation.
Clicking the "Close Breakout Boards" button sends a notification to each student, asking them to leave their breakout board. You cannot create new breakout boards while existing ones are still open.
You can close this dialog and return to it later, by clicking the button in the top bar. This icon is only visible when breakout boards are active, otherwise it is accessible from the student list.
Breakout boards behave exactly like normal boards, and can be shared the same way.
